We Repair All Type Brand Oppo, Vivo, MI, Samsung

Gtech Mobile Repairig Nagra Road bilaunjha Mau, Click This Link And View My All Repairing Videos

All Type Mobile Software Service Available

All types of mobile software is done online or offline. Contact for online service.

Mobile Repairing Hardware Solution

We Provide All Type Mobile Hardware Repairing Solution in Image like Jumper Pic

Gtech Mobile Repairing YT Channel

Here We Post All Type Brand Repairng Videos.Tab This Link And See My all Videos,And Do't Forgate Like, Subcribe

Leptop,Desktop Software solution

All type Windows And driver Available.

All Samsung Mobile Phone Flashing Tutorial

All Samsung Mobile Phone Flashing Tutorial Step By Step 

Friends, Samsung has some kind of CPU in its mobile flashing from its Flash file. For example, if the extinction (. TAR) of the Flash file comes, then flushing it with the odin tool. And when (.pac) comes, use the Research Download tool. If you do not know who is the extinction of the CPU's firmware, and which tool is used for which extinction. So you can see by clicking on the link below. ⟹ Know All Firmware Extinction
Mobile keypad or orroid should do its flashing flash according to the file's extraction.


Sign Software Problems in Android Mobile

  1. Stuck on logo
  2. Working Slowly Mobile
  3. Coming to the Mobile Phone Virus
  4. Stop the working of an app
  5. Error getting mobile on Flash with Firmware
  6. Inaccuracy regarding mobile phone software
Essential tools for flinging Samsung Android mobile
  1. Computer
  2. Original data cable
  3. Mobile 
  4. Stock Rom
  5. Flashing Tool-Odin tool 
  6. Flashing Usb Driver Mobile
Step 1. The mobile to flash. Dawnload its Flash File from Google. To do Dawnload, please search for Mode Name + Stock Rom or Flash File


Keep in mind, while downloading Samsung's Flash file, always download Country wise File.
If you are in India (.info) Download File


Samsung gives two-way firmware file.
Single Flash file, in which all the files that are Firmware remain compressed, which does not delete user data when flashing. We select from the SINGLE file AP and flash it.


   Stock Rom gives a lot to Samsung Multi File. Which contains 4 files,
  1. BL boot-loader - file to be processed when the mobile is BOOTING
  2. AP (PDA) Android Partition - System File of the Internet
  3. CP is Modem File in which the network file loads
  4. CSC Consumer Software Customization, - This file contains user data store


STep
  • Download Odin tool from Google and open it
  • Install USB driver, if it is already installed, then skip this step.
  • Use the file in the given option (if there is a single file, then we will call in AP, 4 file BL to BL, AP (PDA) to AP, CP to CP, CSC to CSC)
  • Now Click OK After some time you will see the green signal, then mobile flashing will be completed.


What is CMOS Battery and How to Identify its Failure


Comos battery is installed on the computer and laptop's motherboard. Its complete form (complementary metal-oxide-semiconductor) is a technology used to make microprocessor, microcontroller and other digital logic circuits. comos battery ensures time and data of hardware and system which is part of a BIOS setting. CMOS battery maintains its data even after the computer or laptop is shut down.


Cmos battery details

Life line of Cmos Battery is 10 years old.
BIOS settings store non -Volatile, which does not require constant power to retain data. However, the motherboard uses RTC (real time clock) because clock is always active, whether the computer is active or not. It's not a quartz watch like a simple clock used by people. When the computer or laptop is switched off, then the RTC Clock takes the voltage to work with the COMOS Battery, and in this way, it also tells the timing correct when opening.
But the main function of CMOS battery is to store the BIOS settings of your computer. BIOS allows the system to recognize available hardware and device drivers. If there is a problem with the CMOS battery, the BIOS will not get all the data that is required and the computer will not work as it should. There are some hints that will tell you about the failure of CMOS batteries, here you can come with:

  1. An indicator of CMOS battery failure is that sometimes your PC does not turn on for some time after the shutdown. If the driver stops working, it can also be tied to CMOs.
  2. Getting "CMOS checksum error", "CMOSerror" or other similar notifications while booting.
  3. Hardware issues are also indicative of the failure of CMOS batteries. You can also see that your computer is having difficulty identifying the keyboard, mouse or printer.
  4.  If your computer has incorrect date and time settings, then it may be due to CMOS battery failure. In addition, you can notice that the date / time is being reset even after you have fixed this in the BIOS.


Samsung S6 G920F Charging Paused Problem Solution


Samsung S6 G920F Charging Paused Battery Temperature Too Low Or High Problem Repair Solution

Friends, if the problem of paused charging in Samsung S6 G920F is coming, then this tutorial might be helpful for you.
Charging problem comes due to damage to water damage or resistor. The problem of paused is due to a tharmistor resistor, this resistor is placed in both the mobile phone and its battery.

Solution Fallow All Step
1. First change the mobile battery, if the problem is not resolved then open the mobile phone
2. After opening the phone, clean it.
3. If you have the Circuit diagrams of G920F, then you can see the thermistor resistor in it, due to which this problem occurs
4. pcb, it troubleshoot the resistor well and then replace it.


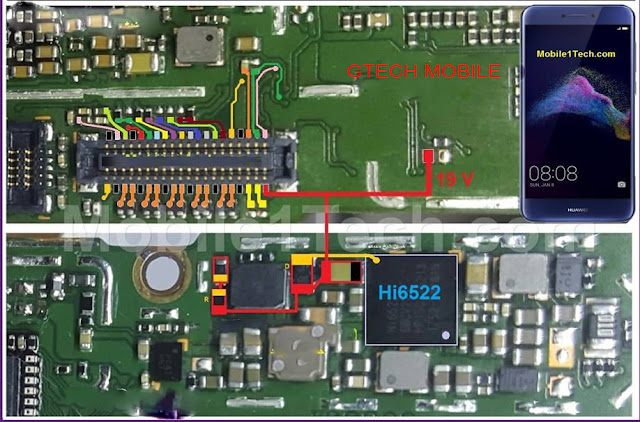
Huawei P8 Lite Display Light Ways Backlight Jumper Solution


Huawei P8 Light Displays Light Ways Backlight Jumper Solution Huawei P8 Lite LCD Lights do not work repairing. For "Huawei P8 Lite Display Lite Ways" with Image Image How do users also learn? Solution * If display lights are not working_dark display, damaged display connector problem. today! I'm going to share with you__How to fix missing display light error in Huawei P8 Lite.

Problame
1. There is no light at the display. Mobile phone power on but nothing on display.
2.  All other functions are working but the LED’s are going faulted and nothing at the display.
3.  Front panel, display connector is damaged, missing or not working. Something is missing.
4.  There is not current at the display connector light pins.

Huawei P8 LiteDisplay Light Ways -LCD Light Jumper:

lcd light jumper


Schematic digrams


Solution
  1.  1.First make your mobile display light setting ,  If the display lights setting is active and there is no issue of disabled lights function. You need to repair this issue (Dark display) display light is not working from the hardware repairing or troubleshooting.
    2.Clean both connector at motherboard and display strip and try to Power on .
    3.enable voltage chek which comes to the resistor near Charging ic. If it is not coming, then give it an en signal.
    4.chek boost coile if boost coile is faulty then change boost coile .
    5.Check the 30 voltage which comes on the diode near the ic, which goes to led anode, as seen in diagrams.
    6.If there is no current at the connector pins. Try to clean or test the light controller chip.
    7.For the faulted display lights from the front panel, __You need to fix it by repairing the lights section.

All iphone Schematic Diagrams

All iphone Schematic Diagrams

schematic, or schematic diagram, is a representation of the elements of a system using abstract, graphic symbols rather than realistic pictures. A schematic usually omits all details that are not relevant to the key information the schematic is intended to convey, and may include oversimplified elements in order to make this essential meaning easier to grasp. hera you download all iphone model schematic diagrams in one click
iphone Schematic Diagrams


                      MODEL NO.
    CLICK To DOWNLOAD                          
iPhone 2
                               Dawnload
iPhone 3G
                               download
iPhone 3GS
                               download
iPhone 4
                               download
iPhone 4S
                               download
iPhone 5
                               download
iPhone 5C schematics diagram
                               download
iPhone 5S
                               download
iPhone 6 Schematic Diagram
                               download
iPhone 6S Schematic Diagram
                               download
iPhone 6S Plus Schematic Diagram
                               download
iPhone 7
                               download
iPhone 7 Plus
                               download
iPhone 8
                               download
iphone 8 Plus
                               download
iPhone X Qualcomm
                               download
iPhone x Intel
                               Dawnload
iphone SE
                               download
iPhone XS Max
                               download
iPhone XS
                               download

Convert Digital/Crystal Mic to Universal MIc


There are three tips in the crystal mic VDD, DATA, GND, as you see in the picture.


But in the digital mic, there are four or five tips mic that includes VDD, DATA, CLOCK, GND

And the mic which is used in a mobile phone, according to which it has tips, but it is necessary to identify it. The data and the clock line in pcb comes from audio IC and VDD power ic. On the mic tips in mobile, only two tips on the VDD clk comes readings and a beep on the gnd, so you can easily find the mic's VDD, GND and CLK tips with the help of Multimeter.
So now let's talk about how to convert digital / crystal mic to a universal mic.
For this, with a 1k to 4.7k resistor between DATA and VDD tips, Universal MIc will start running Universal MIc's POSITIVE and GND to NEGATIVE with tips from DATA.               
                               
               Read:
                                     How to Test Mic Using Multimiter ....


How to Read Samsung Combination Firmware Later Code


Exampal 1         I5700XXJE4

I5700                         XX                                             
 JE4   
Modal number     Country name                                version details               
XX    = Austria, Belgium, France, Germany, Hungary, Italy, Spain, United Kingdom
J  = 2010,year
E = May, Month
4 = Version 4
Exampal 2 CSC NO.              G935FODD4ESB4
  G935F                       ODD                4E                       SB4 JO
Model Name       County name       Binary no.           Version Details

ODD = India
4E  =  4, Binary Number
S  = 2019,Year
B = February,Month
4 = Version 4

Android Version 
FA4.1 =  Jelly bean
FA4.4 =  KitKat
FA5.0 =  Lolipap
FA6.0 =  Marshmallow 
FA7.0 =  Nougat
FA8.0 =  Oreo
FA9    =  Pie 
FA10  =   Android 10
FA11  =   Android11

Letter=Year/ Month

A=2001 / January
B=2002 / February
C=2003 / March
D=2004 / April
E=2005 / May
F=2006 / June
G=2007 / Jule
H=2008 / August
I=2009 / September
J= 2010 / October
K= 2011 / November
L= 2012 / December
M=2013
N=2014
O=2015
P=2016
Q=2017
R=2018
S=2019
T=2020
CODE: COUNTRY
AW=Hungary
AZ=France
BD=Cyprus, Greece
BY=Greece
CB=Poland
CE=Benelux

CP=Denmark, Finland, Norway, Sweden
DB=Vietnam
DC=Thailand
DD=India
DT=Australia
DX=Indonesia, Malaysia, Philippines, Singapore, Vietnam
DZ=Malaysia, Singapore
JA=South Africa
JC=Algeria, Morocco, Nigeria, South Africa, Tunisia
JP=Arabic
JR=Arabic
JV=Algeria, Egypt, Iran, Iraq, Kuwait, Morocco, Nigeria, Oman, Pakistan, Saudi Arabia,South Africa, Syria, Tunisia, Turkey
JW=West Africa
ME=France
MK=Serbia
MS=France, Germany, Italy, Netherlands, Portugal, Spain, Turkey, UK
MT=Switserland
MY=Italy
NH=Latvia
PO=France
PU=Russia
UB=Brazil
XA=Austria, France, Germany, Italy, Netherlands, Switzerland, United Kingdom
XB=Denmark, Norway, Sweden
XC=Portugal, Spain
XD=Croatia, Czech, Hungary, Slovakia
XE=Bulgaria, Estonia, Kazakhstan, Latvia, Lithuania, Russia, Ukraine
XF=Bulgaria, Croatia, Romania
XP=UK, France, Italy, Spain, Netherlands, Poland, Portuguese, Turkey
XX=Austria, Belgium, France, Germany, Hungary, Italy, Spain, United Kingdom
ZC=China, Hong Kong
ZH=Hong Kong
ZT=Taiwan

How to Remove any Mediatek Device Pattern Lock


In this tutorial, I am going to  tell you how to remove the pattern lock on any mediatek cpu device. using SP Flash Tools.
Remove Pattern Lock on Mediatek Cpu Device

Fallow All Step  
Step 1. Download And Install Mediatek USB Driver  according your windows Configuration
Step 2.  Download SP Flash tool in Given Link And extract this zip File ,after extracting you will get the following File
                                                         →  Click to Download


Step 3. Whatever mediatek cpu want to unlock the phone's pattern, download its flash file and extract this file
Step 4. Now Power Off Your Device


 Step 5. Now Open SP Flash tool


Step 6. Click On The Scatter loading button and the Scatter file From the firmware folder( you will Get the Scatter file in all mediatek stock firmware)


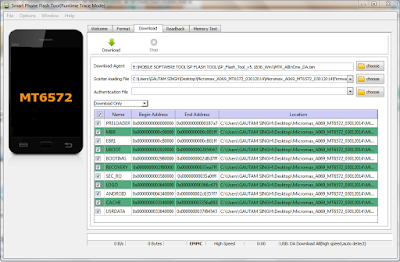
Step 7. Once scatter file is loaded in SP flash tool, you will be able to see following screen


Step 8. Now select Download Method as Download only and uptic.k all available name ,except userdata.


Step 9. Now Click Download Button


Step 10. Connect your Device to the computer using the USB Cable  (make sure device is off) After Press Volume Down or Volume UP key
Step 11. Once flashing completed you will see the green ring in the end.


Step 12 Now Close SP flash tool on your Computer and disconnect your device ,After Completed process Automatic restart your Mobile Phone